


Discover the Kitchen Tool Everyone Is Raving About!
- • Precision Engineered: Sharp blade with durable craftsmanship.
- • Comfort First: Ergonomic design for effortless slicing.
- • Stylish & Strong: Elegant wood handle meets stainless steel strength.
- • Risk-Free Pick: Thousands of happy home chefs can’t be wrong.
- • Today’s Deal: Just $29.95 instead of $99.85 — limited-time offer!
This post may include affiliate links — learn more here .
Introduction
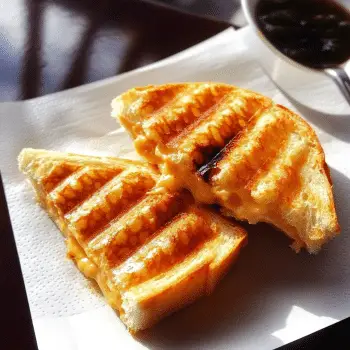
Mini Grilled Cheese sandwiches are the ultimate finger food for your Super Bowl party, combining the crispy, buttery goodness of a grilled cheese sandwich with bite-sized fun! These mini versions are perfect for snacking during the game, offering a nostalgic and comforting flavor. With melty cheese and golden, crispy bread, they make an irresistible treat for guests of all ages.
I remember the first time I made these for a game day gathering. Everyone loved the perfect balance of crispy and gooey, and the mini size made them even more fun to eat. What’s great about Mini Grilled Cheese sandwiches is how versatile they are—you can serve them with classic tomato soup for dipping or enjoy them on their own as a simple, comforting snack. Whether you’re feeding a crowd or just looking for a quick snack, these mini sandwiches are sure to be a hit!
Perfect for:
- Super Bowl parties
- Game day snacks
- Family gatherings
- Kid-friendly events
- Casual get-togethers
Why You’ll Love This Recipe
Here’s why Mini Grilled Cheese sandwiches are a must for your Super Bowl spread:
- Bite-Sized Delights: The mini size makes them perfect for snacking and sharing, and they’re easy to grab and go while watching the game.
- Crispy, Buttery Perfection: Each sandwich is grilled to a golden, crispy texture with a rich, buttery flavor.
- Cheese Galore: Gooey, melted cheese is the star of the show, providing that perfect bite every time.
- Easy to Customize: Add herbs, different cheeses, or seasonings to make them your own.
- Kid-Friendly: These are simple and loved by both kids and adults, making them a versatile addition to any party.
Preparation and Cooking Time
- Total Time: 20 minutes
- Preparation Time: 5 minutes
- Cooking Time: 15 minutes
- Servings: 12 mini sandwiches
- Calories per serving: Approximately 150-200 calories
- Key Nutrients: Protein: 6g, Carbs: 18g, Fat: 10g
Ingredients
Gather these ingredients to make your Mini Grilled Cheese sandwiches:
For the Sandwiches:
- 12 slices of white or whole wheat bread
- 6 oz sharp cheddar cheese (or your preferred cheese)
- 6 oz mozzarella cheese (or your preferred cheese)
- 2 tablespoons unsalted butter, softened
- 1 tablespoon olive oil (optional, for extra crispness)
Optional Seasonings and Add-Ins:
- 1 teaspoon garlic powder
- 1 teaspoon dried oregano or basil
- Fresh herbs for garnish (optional)
- Tomato soup for dipping (optional, but classic!)
Ingredient Highlights
- Cheddar and Mozzarella: These two cheeses melt beautifully, offering a perfect blend of flavor and texture.
- Butter: Adds that irresistible golden crispiness to the bread.
- Olive Oil: Optional for extra crispiness, especially if you’re using it in place of or alongside butter.
- Garlic Powder and Dried Herbs: Optional seasonings that add an extra flavor boost to the grilled cheese.
Step-by-Step
 Instructions
Here’s how to make your Mini Grilled Cheese sandwiches:
Prepare the Ingredients:
- Cut the Bread: Using a serrated knife, trim the crusts off the bread slices if desired, then cut each slice in half or quarters to make mini sandwiches.
- Slice the Cheese: Cut your cheese into slices or use pre-sliced cheese for convenience.
Assemble the Sandwiches:
- Butter the Bread: Spread a thin layer of butter on one side of each mini bread slice.
- Layer the Cheese: Place a slice of cheddar and mozzarella cheese between two slices of bread, with the buttered sides facing outward. Repeat this for each mini sandwich.
Grill the Sandwiches:
- Preheat the Pan: Heat a large skillet or griddle over medium heat.
- Grill the Sandwiches: Place the mini sandwiches on the skillet and grill for 2-3 minutes per side or until the bread is golden brown and the cheese is melted and gooey. If you like a more crispy texture, add a splash of olive oil to the pan for extra crunch.
- Serve Immediately: Once grilled to perfection, remove the mini sandwiches from the pan and cut them in half if needed. Serve immediately while the cheese is still warm and gooey.
Optional Dipping Sauce:
- Tomato Soup: Serve with a classic, creamy tomato soup for dipping, or prepare a quick homemade version.
- Spicy Ketchup: Add a dash of hot sauce or paprika to your ketchup for a spicy twist.
How to Serve
- On a Platter: Arrange the mini sandwiches on a platter for easy snacking.
- With Dipping Sauce: Provide tomato soup or spicy ketchup for dipping.
- Garnished with Fresh Herbs: Top with fresh basil or parsley for an extra pop of color and flavor.
- For Kid-Friendly Fun: Serve with a side of fruit, chips, or pickles for a complete meal.
Additional Tips
- Use Different Cheeses: Swap out the cheddar and mozzarella for your favorite cheeses like Swiss, Gouda, or Gruyère.
- Herb-Infused Butter: Infuse your butter with garlic or fresh herbs like rosemary for an extra burst of flavor.
- Grill in Batches: If you’re serving a crowd, grill the sandwiches in batches to ensure each one gets that golden, crispy perfection.
- Vegan Option: Use vegan butter and non-dairy cheese to make these sandwiches vegan-friendly.
Recipe Variations
- Spicy Jalapeño Grilled Cheese: Add sliced jalapeños to the filling for a spicy kick.
- Tomato Basil Mini Grilled Cheese: Add a slice of fresh tomato and basil for a Caprese twist.
- Pesto Grilled Cheese: Spread a little pesto on the inside of the bread for a fresh, herbal flavor.
- Avocado Grilled Cheese: Add sliced avocado to the cheese filling for added creaminess and texture.
- Mushroom and Swiss Mini Grilled Cheese: Swap in sautéed mushrooms and Swiss cheese for an earthy flavor profile.
- Buffalo Chicken Mini Grilled Cheese: Add cooked chicken and buffalo sauce to make a hearty, spicy sandwich.
- Cheese and Ham Mini Grilled Cheese: Add a slice of ham for a traditional take on grilled cheese.
- Cheese and Pickles Mini Grilled Cheese: Add pickles for a tangy crunch.
- Apple and Brie Mini Grilled Cheese: Add thinly sliced apples and brie cheese for a sweet and savory combo.
- Cheddar and Spinach Mini Grilled Cheese: Add a handful of fresh spinach to the filling for a healthier twist.
Freezing and Storage
- Freezing: Freeze the assembled sandwiches before grilling. Place parchment paper between sandwiches and store in an airtight bag for up to 2 months. Grill from frozen.
- Storage: Refrigerate leftover sandwiches for up to 2 days. Reheat in a skillet to maintain crispness.
Special Equipment
- Large skillet or griddle
- Serrated knife for slicing bread
- Butter knife for spreading
FAQ Section
- Can I make these in advance? Yes, you can assemble the sandwiches ahead of time and grill them just before serving.
- Can I use a panini press? Yes, a panini press works great for grilling mini sandwiches evenly.
- Can I make these without butter? You can use olive oil instead of butter for a dairy-free option.
- Can I freeze grilled cheese sandwiches? Yes, assemble and freeze them before grilling for later use.
- Can I add bacon? Yes, you can easily add cooked bacon if desired (though it’s excluded here per your preference).
Mini Grilled Cheese

- Prep Time: 5 minutes
- Cook Time: 15 minutes
- Total Time: 20 minutes
Ingredients
For the Sandwiches:
- 12 slices of white or whole wheat bread
- 6 oz sharp cheddar cheese (or your preferred cheese)
- 6 oz mozzarella cheese (or your preferred cheese)
- 2 tablespoons unsalted butter, softened
- 1 tablespoon olive oil (optional, for extra crispness)
Optional Seasonings and Add-Ins:
- 1 teaspoon garlic powder
- 1 teaspoon dried oregano or basil
- Fresh herbs for garnish (optional)
- Tomato soup for dipping (optional, but classic!)
Instructions
Prepare the Ingredients:
- Cut the Bread: Using a serrated knife, trim the crusts off the bread slices if desired, then cut each slice in half or quarters to make mini sandwiches.
- Slice the Cheese: Cut your cheese into slices or use pre-sliced cheese for convenience.
Assemble the Sandwiches:
- Butter the Bread: Spread a thin layer of butter on one side of each mini bread slice.
- Layer the Cheese: Place a slice of cheddar and mozzarella cheese between two slices of bread, with the buttered sides facing outward. Repeat this for each mini sandwich.
Grill the Sandwiches:
- Preheat the Pan: Heat a large skillet or griddle over medium heat.
- Grill the Sandwiches: Place the mini sandwiches on the skillet and grill for 2-3 minutes per side or until the bread is golden brown and the cheese is melted and gooey. If you like a more crispy texture, add a splash of olive oil to the pan for extra crunch.
- Serve Immediately: Once grilled to perfection, remove the mini sandwiches from the pan and cut them in half if needed. Serve immediately while the cheese is still warm and gooey.
Optional Dipping Sauce:
- Tomato Soup: Serve with a classic, creamy tomato soup for dipping, or prepare a quick homemade version.
- Spicy Ketchup: Add a dash of hot sauce or paprika to your ketchup for a spicy twist.
Nutrition
- Serving Size: 12 mini sandwiches
- Calories: 150-200
- Fat: 10g
- Carbohydrates: 18g
- Protein: 6g
Conclusion
Mini Grilled Cheese Sandwiches are the ultimate comfort food for any occasion. These bite-sized treats are crispy on the outside, gooey and melty on the inside, and packed with cheesy goodness. Perfect for your Super Bowl spread, casual get-togethers, or just a cozy snack, these little sandwiches are a crowd favorite that never disappoints.
The best part? They’re super easy to make and totally customizable. You can use your favorite cheeses, add a little bacon or tomato, or even spice things up with a touch of mustard or hot sauce. Whether served with soup, chips, or on their own, these mini grilled cheese sandwiches are sure to be the star of the show.
I’d love to see how your Mini Grilled Cheese Sandwiches turn out! Snap a photo, share it on social media, and don’t forget to tag me—I can’t wait to see your delicious creations. Enjoy every cheesy bite!