

Discover the Kitchen Tool Everyone Is Raving About!
- • Precision Engineered: Sharp blade with durable craftsmanship.
- • Comfort First: Ergonomic design for effortless slicing.
- • Stylish & Strong: Elegant wood handle meets stainless steel strength.
- • Risk-Free Pick: Thousands of happy home chefs can’t be wrong.
- • Today’s Deal: Just $29.95 instead of $99.85 — limited-time offer!
This post may include affiliate links — learn more here .
Introduction
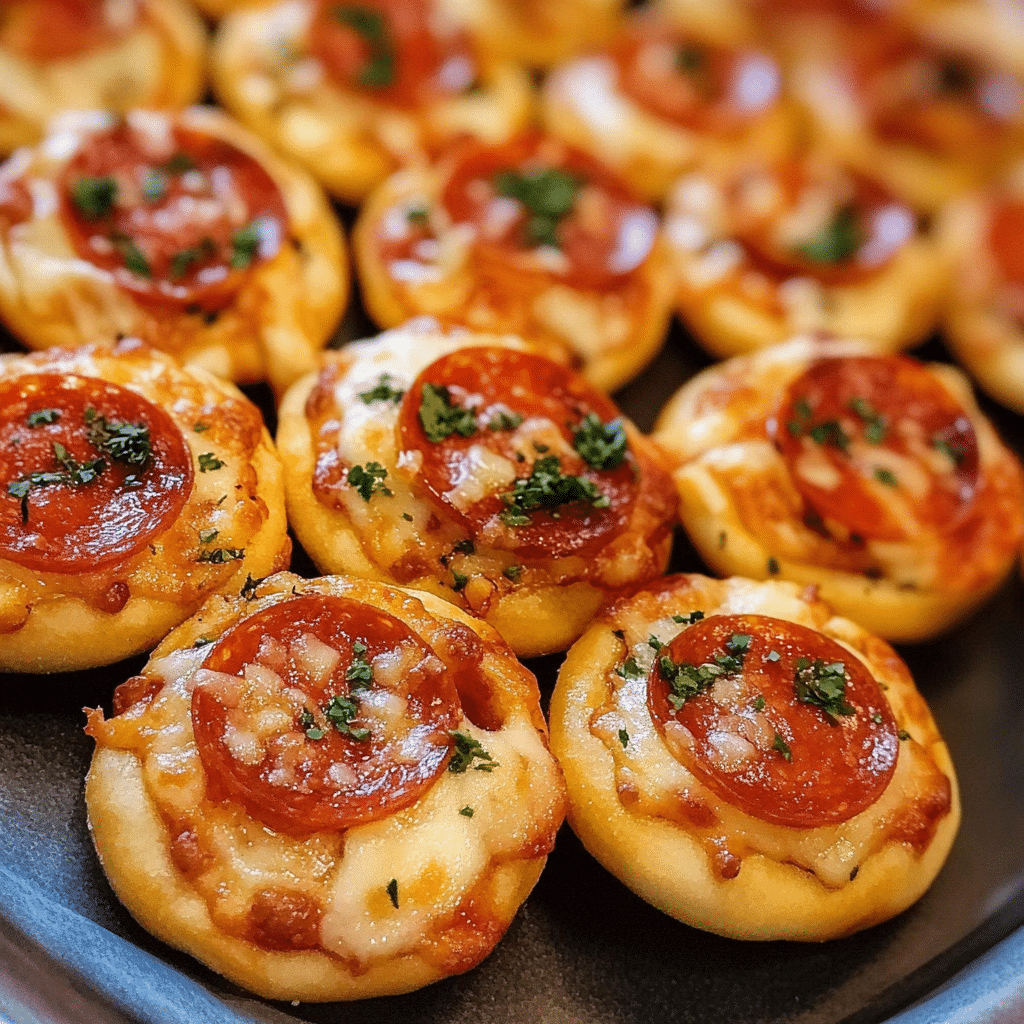
Mini Pizza offers all the deliciousness of a traditional pizza in a convenient, bite-sized form. Whether you’re craving a quick snack or serving up a fun meal for friends and family, these mini pizzas are easy to make and customizable to suit any taste. With a crispy crust, savory tomato sauce, melted cheese, and a variety of toppings, these little pizzas are perfect for any occasion. Plus, they’re simple to prepare and bake, making them an ideal choice for busy weeknights, casual gatherings, or kids’ parties.
I remember the first time I made them for a family get-together. Everyone loved how easy it was to make different variations for each person’s preferences—whether it was pepperoni, veggies, or extra cheese. The best part is how versatile they are—you can mix and match toppings and sauces to create endless combinations. Whether you’re adding a drizzle of pesto or switching up the cheese, these mini pizzas are perfect for satisfying everyone’s cravings. Whether for a weeknight dinner or a fun party treat, they’re always a crowd-pleaser!
Perfect for:
- Quick weeknight meals
- Kids’ parties
- Snack time
- Game day gatherings
- Personalized pizzas for everyone
Why You’ll Love This Recipe
Here’s why Mini Pizzas are bound to become your new go-to dish:
- Customizable Toppings: Choose your favorite veggies, cheeses, and protein options to create a pizza tailored to your taste.
- Fun and Interactive: Perfect for family meals, where everyone can add their own toppings and get involved in the cooking process.
- Crispy and Delicious: The crust bakes up crisp and golden, while the cheese melts perfectly for that classic pizza experience.
- Perfectly Sized: These mini pizzas are great for portion control and make it easy to serve multiple guests without cutting into a large pie.
- Quick and Easy: With just a few ingredients and simple prep, these mini pizzas are a breeze to put together.
Preparation and Cooking Time
- Total Time: 30 minutes
- Preparation Time: 10 minutes
- Cooking Time: 15-20 minutes
- Servings: 8 mini pizzas
- Calories per serving: Approximately 250-300 calories
- Key Nutrients: Protein: 10g, Carbs: 30g, Fat: 12g
Ingredients
Gather these ingredients to make your Mini Pizzas:
For the Crust:
- 1 package pre-made pizza dough (or homemade if preferred)
- 1 tablespoon olive oil (optional, for brushing)
For the Sauce:
- 1 cup pizza sauce (store-bought or homemade)
- 1 teaspoon dried oregano (optional)
For the Toppings:
- 1 ½ cups shredded mozzarella cheese
- ½ cup sliced bell peppers (red, green, or yellow)
- ½ cup sliced mushrooms
- ½ cup black olives, sliced
- ½ cup diced tomatoes
- 1 cup spinach leaves (optional)
- 1 small red onion, thinly sliced
- 1 cup grilled chicken, pepperoni, or other preferred protein (optional)
For Garnish (Optional):
- Fresh basil leaves
- Crushed red pepper flakes
- Grated Parmesan cheese
Ingredient Highlights
- Pizza Dough: The foundation of any great pizza, offering a crisp and chewy texture.
- Mozzarella Cheese: This classic pizza cheese melts beautifully and provides the right level of creaminess.
- Pizza Sauce: Adds that rich, tangy flavor essential to any pizza.
- Toppings: Customize your mini pizzas with your favorite vegetables, proteins, and herbs for a personalized touch.
- Olive Oil: Brushing the dough with olive oil adds a golden, crispy finish to the crust.
Step-by-Step
 Instructions
Here’s how to make Mini Pizzas:
Prepare the Dough:
- Preheat the Oven: Preheat your oven to 425°F (220°C). Line a baking sheet with parchment paper or a silicone baking mat for easy cleanup.
- Roll Out the Dough: If using store-bought dough, roll it out on a floured surface into a thin sheet. Use a round cookie cutter or a glass to cut out small circles (about 4-5 inches in diameter) for your mini pizzas.
- Brush with Olive Oil (Optional): If desired, brush each mini pizza dough circle lightly with olive oil to help the crust turn golden and crispy.
Assemble the Pizzas:
- Add Sauce: Spread a tablespoon of pizza sauce onto each mini pizza dough, leaving a small border around the edges.
- Top with Cheese: Sprinkle shredded mozzarella cheese over the sauce, covering each mini pizza evenly.
- Add Toppings: Add your choice of vegetables, protein, and any additional toppings on top of the cheese.
Bake the Mini Pizzas:
- Bake the Pizzas: Place the mini pizzas on the prepared baking sheet and bake in the preheated oven for 10-15 minutes, or until the crust is golden brown and the cheese is melted and bubbly.
- Check for Crispness: If you prefer a crispier crust, bake for an additional 2-3 minutes, keeping an eye on them to prevent burning.
Serve and Garnish:
- Garnish and Serve: Once baked, remove the mini pizzas from the oven. Optionally, top with fresh basil leaves, grated Parmesan cheese, and crushed red pepper flakes for added flavor.
- Serve Immediately: Serve the mini pizzas warm, and enjoy!
How to Serve
Mini Pizzas are versatile and can be served in various ways:
- As Party Appetizers: Serve them on a platter with a variety of toppings for guests to choose from.
- With a Side Salad: Pair with a simple side salad of greens and a light vinaigrette for a well-rounded meal.
- For Kids’ Meals: Let kids create their own pizzas with their favorite toppings for a fun, interactive meal.
- As a Snack: Enjoy as an afternoon snack, or serve as a quick, easy dinner after a busy day.
Additional Tips
Here are some tips to ensure your Mini Pizzas turn out perfectly:
- Use Room Temperature Dough: Let the pizza dough sit at room temperature for about 10 minutes before rolling it out for easier handling.
- Don’t Overload with Toppings: While toppings are great, be careful not to overload the mini pizzas, as this can make them soggy.
- Use a Pizza Stone: If you have a pizza stone, preheat it in the oven and bake the mini pizzas directly on it for an even crisper crust.
- Pre-Bake the Dough: If you prefer an extra crispy crust, pre-bake the dough for 3-5 minutes before adding the sauce and toppings.
Recipe Variations
Here are 10 variations you can try for Mini Pizzas:
- Vegetarian Mini Pizza: Load up your pizza with a variety of vegetables such as bell peppers, mushrooms, onions, spinach, and tomatoes.
- Chicken Pesto Mini Pizza: Use pesto sauce instead of pizza sauce, and top with grilled chicken and mozzarella.
- Caprese Mini Pizza: Add fresh mozzarella, sliced tomatoes, and basil for a simple and fresh pizza.
- BBQ Chicken Mini Pizza: Top your mini pizza with BBQ sauce, grilled chicken, red onions, and cilantro.
- Margarita Mini Pizza: For a classic taste, top with fresh mozzarella, tomatoes, and basil leaves.
- Greek Mini Pizza: Use hummus as the base sauce and top with olives, cucumbers, feta cheese, and red onions.
- Hawaiian Mini Pizza: Top with pineapple chunks, grilled chicken, and a sprinkle of mozzarella cheese for a sweet-savory combo.
- Buffalo Chicken Mini Pizza: Drizzle with buffalo sauce and top with grilled chicken, mozzarella, and blue cheese.
- Zucchini Mini Pizza: For a gluten-free option, use zucchini slices as the base and top with cheese and your favorite toppings.
- Meat Lover’s Mini Pizza (without pork): Top with grilled chicken, ground beef, and turkey pepperoni for a hearty meat pizza.
Freezing and Storage
- Freezing: To freeze mini pizzas, assemble them without baking and freeze on a baking sheet. Once frozen, transfer to a zip-top bag or airtight container. When ready to eat, bake from frozen at 425°F (220°C) for 10-15 minutes.
- Storage: Store leftover mini pizzas in the refrigerator, tightly covered, for up to 3 days. Reheat in the oven or microwave.
Special Equipment
Here are some special equipment items to make preparing your Mini Pizzas easier:
- Pizza Cutter: A handy tool for cutting your mini pizzas into perfect slices.
- Rolling Pin: Useful for rolling out the pizza dough to an even thickness.
- Baking Sheet: A must for baking your mini pizzas and ensuring even heat distribution.
- Cookie Cutter: If you want uniform mini pizza sizes, a round cookie cutter is ideal.
FAQ Section
- Can I use store-bought pizza dough?
Yes, store-bought pizza dough works perfectly for mini pizzas, saving you time and effort. - Can I freeze the mini pizzas?
Yes, you can freeze the assembled but unbaked mini pizzas for later use. Simply bake from frozen when you’re ready to enjoy them. - What other toppings can I use?
Feel free to get creative with toppings! Some great options include roasted vegetables, ricotta cheese, artichoke hearts, or fresh herbs like oregano and thyme. - Can I make these gluten-free?
Yes, you can use gluten-free pizza dough for a gluten-free version of mini pizzas. - Can I make mini pizzas without cheese?
Yes, you can make dairy-free mini pizzas by omitting the cheese and using a vegan cheese substitute or simply topping with extra veggies.
Mini Pizza

- Prep Time: 10 minutes
- Cook Time: 15-20 minutes
- Total Time: 30 minutes
Ingredients
For the Crust:
- 1 package pre-made pizza dough (or homemade if preferred)
- 1 tablespoon olive oil (optional, for brushing)
For the Sauce:
- 1 cup pizza sauce (store-bought or homemade)
- 1 teaspoon dried oregano (optional)
For the Toppings:
- 1 ½ cups shredded mozzarella cheese
- ½ cup sliced bell peppers (red, green, or yellow)
- ½ cup sliced mushrooms
- ½ cup black olives, sliced
- ½ cup diced tomatoes
- 1 cup spinach leaves (optional)
- 1 small red onion, thinly sliced
- 1 cup grilled chicken, pepperoni, or other preferred protein (optional)
For Garnish (Optional):
- Fresh basil leaves
- Crushed red pepper flakes
- Grated Parmesan cheese
Instructions
Prepare the Dough:
- Preheat the Oven: Preheat your oven to 425°F (220°C). Line a baking sheet with parchment paper or a silicone baking mat for easy cleanup.
- Roll Out the Dough: If using store-bought dough, roll it out on a floured surface into a thin sheet. Use a round cookie cutter or a glass to cut out small circles (about 4-5 inches in diameter) for your mini pizzas.
- Brush with Olive Oil (Optional): If desired, brush each mini pizza dough circle lightly with olive oil to help the crust turn golden and crispy.
Assemble the Pizzas:
- Add Sauce: Spread a tablespoon of pizza sauce onto each mini pizza dough, leaving a small border around the edges.
- Top with Cheese: Sprinkle shredded mozzarella cheese over the sauce, covering each mini pizza evenly.
- Add Toppings: Add your choice of vegetables, protein, and any additional toppings on top of the cheese.
Bake the Mini Pizzas:
- Bake the Pizzas: Place the mini pizzas on the prepared baking sheet and bake in the preheated oven for 10-15 minutes, or until the crust is golden brown and the cheese is melted and bubbly.
- Check for Crispness: If you prefer a crispier crust, bake for an additional 2-3 minutes, keeping an eye on them to prevent burning.
Serve and Garnish:
- Garnish and Serve: Once baked, remove the mini pizzas from the oven. Optionally, top with fresh basil leaves, grated Parmesan cheese, and crushed red pepper flakes for added flavor.
- Serve Immediately: Serve the mini pizzas warm, and enjoy!
Nutrition
- Serving Size: 8 mini pizzas
- Calories: 250-300
- Fat: 12g
- Carbohydrates: 30g
- Protein: 10g
Conclusion
Mini Pizzas are a fun, easy, and customizable dish that everyone will enjoy. Whether you’re feeding a crowd or making a quick snack for yourself, these bite-sized pizzas are sure to satisfy. Perfect for any occasion, they are a crowd-pleaser that you can make exactly the way you like. So gather your favorite toppings and get ready to enjoy a delicious, personalized pizza experience!
With their crispy crust, gooey melted cheese, and a variety of toppings to choose from, Mini Pizzas are an absolute treat. From classic pepperoni to fresh veggies or even a sprinkle of extra cheese, the possibilities are endless. Whether you’re serving them for a game night, party, or just as a quick meal, Mini Pizzas are sure to be a hit with everyone.
I’d love to see how your Mini Pizzas turn out! Snap a photo, share it on social media, and don’t forget to tag me—I can’t wait to see your tasty creations. Happy cooking!