


Discover the Kitchen Tool Everyone Is Raving About!
- • Precision Engineered: Sharp blade with durable craftsmanship.
- • Comfort First: Ergonomic design for effortless slicing.
- • Stylish & Strong: Elegant wood handle meets stainless steel strength.
- • Risk-Free Pick: Thousands of happy home chefs can’t be wrong.
- • Today’s Deal: Just $29.95 instead of $99.85 — limited-time offer!
This post may include affiliate links — learn more here .
Introduction
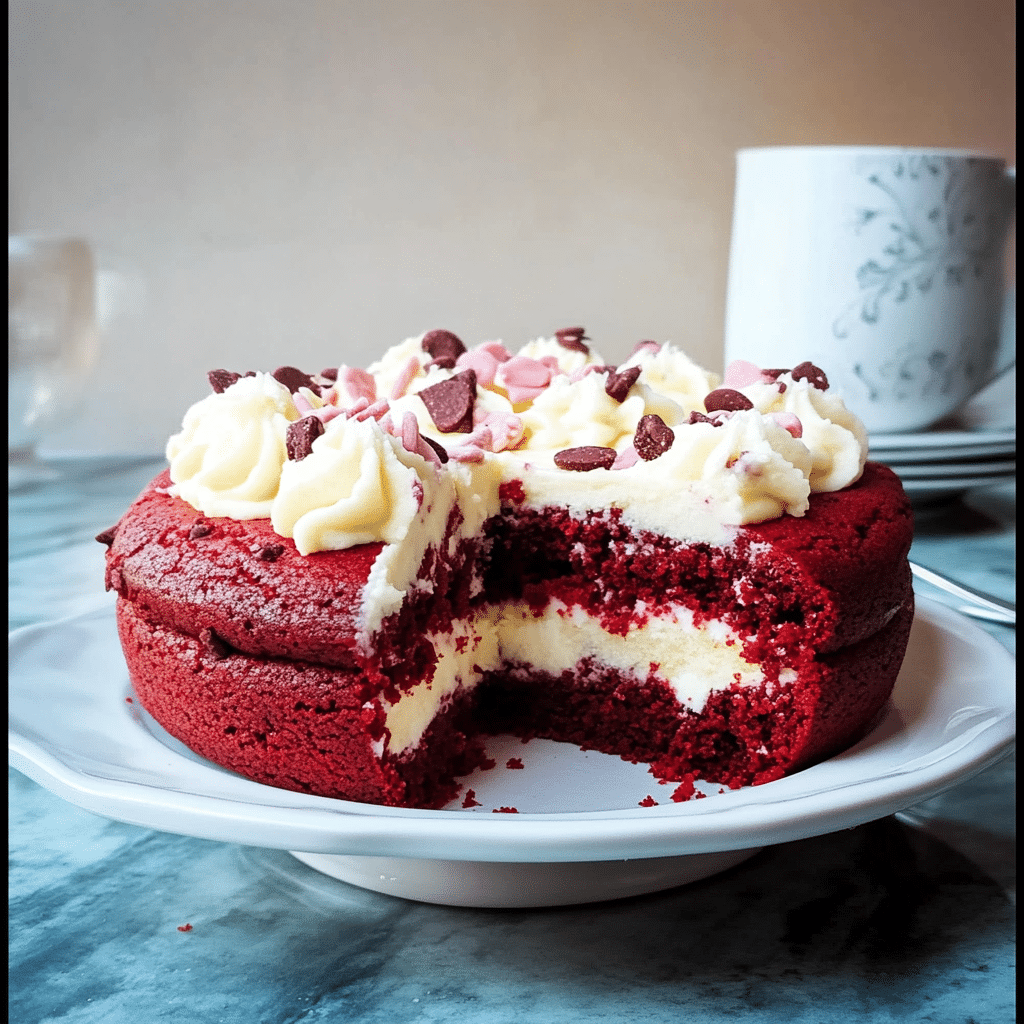
Red Velvet Cookie Cake is a rich and indulgent dessert that combines the classic flavors of red velvet cake with the irresistible texture of a cookie. This soft, chewy cookie cake is packed with the signature tangy flavor of red velvet, topped with a creamy cream cheese frosting, and baked to perfection. It’s a stunning, show-stopping dessert that’s perfect for birthdays, celebrations, or just as a sweet treat to brighten your day. Whether you’re a fan of red velvet or looking for a fun twist on traditional cookie cakes, this dessert will certainly become a favorite.
I remember the first time I made it for a family celebration. The vibrant red color and the creamy frosting were such a hit, and the flavor combination of the tangy red velvet with the sweet cream cheese was simply irresistible. Everyone couldn’t get enough, and it quickly became a requested dessert for future events. This cookie cake is not only delicious but also visually stunning, making it perfect for special occasions or whenever you need a treat that will wow your guests!
Perfect for:
- Birthdays
- Celebrations
- Dessert trays
- Red velvet lovers
- Casual get-togethers
Why You’ll Love This Recipe
Here’s why Red Velvet Cookie Cake will quickly become a go-to dessert:
- Classic Red Velvet Flavor: The subtle cocoa flavor and tangy buttermilk give this cookie cake the perfect red velvet taste.
- Chewy Texture: Unlike cake, this cookie cake has a dense, chewy texture that’s perfect for slicing and sharing.
- Cream Cheese Frosting: The tangy cream cheese frosting balances the sweetness of the cake, creating a perfect flavor combination.
- One-Pan Wonder: This cookie cake is baked in one pan, making it easier to prepare and serve.
- Customizable Toppings: You can decorate it with sprinkles, mini chocolate chips, or even a personalized message for special occasions.
Preparation and Cooking Time
- Total Time: 1 hour 15 minutes
- Preparation Time: 15 minutes
- Baking Time: 25-30 minutes
- Cooling Time: 30 minutes
- Servings: 12-16 servings
- Calories per serving: Approximately 350-400 calories
- Key Nutrients: Protein: 4g, Carbs: 45g, Fat: 18g
Ingredients
Gather these ingredients to make your Red Velvet Cookie Cake:
For the Cookie Cake:
- 2 ½ cups all-purpose flour
- 2 tablespoons unsweetened cocoa powder
- 1 teaspoon baking soda
- ¼ teaspoon salt
- 1 cup unsalted butter, softened
- 1 cup granulated sugar
- 1 large egg
- 2 teaspoons vanilla extract
- 1 tablespoon red food coloring
- 1 teaspoon white vinegar
- 1 teaspoon buttermilk
For the Cream Cheese Frosting:
- 8 oz cream cheese, softened
- ½ cup unsalted butter, softened
- 2 cups powdered sugar
- 1 teaspoon vanilla extract
- Pinch of salt
Ingredient Highlights
- Butter: Adds richness and helps to create a soft, chewy texture in the cookie cake.
- Cocoa Powder: Gives the cookie cake the signature flavor of red velvet with a hint of chocolate.
- Buttermilk and Vinegar: These ingredients give the cookie cake a tangy flavor and help the red velvet flavor shine.
- Cream Cheese: Provides the tangy richness in the frosting, complementing the sweetness of the cookie cake.
- Red Food Coloring: Adds that beautiful, vibrant red hue to the cake, making it instantly recognizable as red velvet.
Step-by-Step
 Instructions
Here’s how to make Red Velvet Cookie Cake:
Prepare the Cookie Cake:
- Preheat the Oven: Preheat your oven to 350°F (175°C). Grease and lightly flour a 9-inch round cake pan or line it with parchment paper.
- Mix the Dry Ingredients: In a medium bowl, whisk together the flour, cocoa powder, baking soda, and salt. Set aside.
- Cream the Butter and Sugar: In a large mixing bowl, beat the softened butter and granulated sugar together with an electric mixer until light and fluffy, about 3-4 minutes.
- Add the Egg, Vanilla, Food Coloring, Vinegar, and Buttermilk: Beat in the egg, vanilla extract, red food coloring, white vinegar, and buttermilk until smooth and combined.
- Add the Dry Ingredients: Gradually add the dry ingredients to the wet ingredients, mixing just until combined. Be careful not to overmix.
- Bake the Cookie Cake: Transfer the dough into the prepared cake pan and press it down into an even layer. Bake for 25-30 minutes, or until a toothpick inserted into the center comes out clean.
- Cool the Cookie Cake: Allow the cookie cake to cool in the pan for about 10 minutes before transferring it to a wire rack to cool completely, about 30 minutes.
Prepare the Cream Cheese Frosting:
- Beat the Cream Cheese and Butter: In a large bowl, beat the softened cream cheese and butter together until smooth and creamy.
- Add the Powdered Sugar and Vanilla: Gradually add the powdered sugar, ½ cup at a time, and beat until smooth and fluffy. Add the vanilla extract and a pinch of salt, and beat until fully combined.
- Frost the Cookie Cake: Once the cookie cake has cooled completely, spread the cream cheese frosting evenly over the top using a spatula.
Serve and Garnish:
- Decorate the Cookie Cake: Optionally, you can decorate the top with sprinkles, mini chocolate chips, or a personalized message using colored frosting.
- Serve: Slice into wedges or squares and enjoy!
How to Serve
- With Ice Cream: Serve with a scoop of vanilla or chocolate ice cream for an extra indulgent treat.
- For Special Occasions: Decorate with colorful sprinkles or even write a message on top with frosting for birthdays or celebrations.
- With a Cup of Coffee: Pair with coffee or hot chocolate for a cozy dessert experience.
- With Fresh Berries: Top with fresh berries like raspberries or strawberries for a refreshing, fruity contrast to the richness of the cookie cake.
Additional Tips
- Soften the Butter and Cream Cheese: Be sure the butter and cream cheese are softened to room temperature for easier mixing and a smoother frosting.
- Don’t Overmix the Dough: Overmixing can make the cookie cake dense. Mix just until combined.
- Chill the Cookie Cake: If you have time, chill the cookie cake after frosting for 15-20 minutes to help the frosting set and make slicing easier.
- Use Gel Food Coloring: Gel food coloring provides a more vibrant color without altering the texture of the dough.
Recipe Variations
Here are some variations you can try for Red Velvet Cookie Cake:
- Chocolate Chip Red Velvet Cookie Cake: Add mini chocolate chips to the dough for extra texture and sweetness.
- Red Velvet Cookie Cake with Nuts: Add chopped walnuts or pecans to the dough for a nutty crunch.
- Vegan Red Velvet Cookie Cake: Substitute the butter with vegan butter and the cream cheese frosting with a dairy-free cream cheese alternative.
- Red Velvet Cookie Cake with a White Chocolate Drizzle: Drizzle melted white chocolate over the frosted cake for an extra touch of indulgence.
- Red Velvet Cookie Cake with a Buttercream Frosting: Use classic buttercream frosting instead of cream cheese frosting for a sweeter option.
Freezing and Storage
- Freezing: Red Velvet Cookie Cake can be frozen for up to 2 months. Wrap it tightly in plastic wrap or foil and store in an airtight container. Thaw at room temperature before serving.
- Storage: Store leftover cookie cake in an airtight container at room temperature for up to 3 days or in the fridge for up to 5 days.
Special Equipment
- Electric Mixer: Helps to cream the butter and sugar smoothly for both the dough and frosting.
- 9-inch Round Cake Pan: Ideal for baking the cookie cake in one large round layer.
- Spatula: Used to spread the cream cheese frosting evenly over the cake.
- Parchment Paper: Helps prevent sticking and makes cleanup easier.
FAQ Section
- Can I use a different color food coloring?
Yes, you can use any color of food coloring you like, but red is traditional for red velvet. - Can I use a store-bought frosting?
Yes, if you prefer, you can use store-bought cream cheese frosting. - Can I make this into smaller cookies instead of a cookie cake?
Absolutely! Scoop the dough into balls and bake on a lined baking sheet at 350°F for about 10-12 minutes. - Can I freeze the cookie cake?
Yes, it freezes well when wrapped tightly. Be sure to thaw it completely before serving. - Can I use a different type of frosting?
Yes, you can use buttercream or even a whipped topping for a lighter frosting option.
Red Velvet Cookie Cake
- Prep Time: 15 minutes
- Cook Time: 25-30 minutes
- Total Time: 1 hour 15 minutes
Ingredients
For the Cookie Cake:
- 2 ½ cups all-purpose flour
- 2 tablespoons unsweetened cocoa powder
- 1 teaspoon baking soda
- ¼ teaspoon salt
- 1 cup unsalted butter, softened
- 1 cup granulated sugar
- 1 large egg
- 2 teaspoons vanilla extract
- 1 tablespoon red food coloring
- 1 teaspoon white vinegar
- 1 teaspoon buttermilk
For the Cream Cheese Frosting:
- 8 oz cream cheese, softened
- ½ cup unsalted butter, softened
- 2 cups powdered sugar
- 1 teaspoon vanilla extract
- Pinch of salt
Instructions
Prepare the Cookie Cake:
- Preheat the Oven: Preheat your oven to 350°F (175°C). Grease and lightly flour a 9-inch round cake pan or line it with parchment paper.
- Mix the Dry Ingredients: In a medium bowl, whisk together the flour, cocoa powder, baking soda, and salt. Set aside.
- Cream the Butter and Sugar: In a large mixing bowl, beat the softened butter and granulated sugar together with an electric mixer until light and fluffy, about 3-4 minutes.
- Add the Egg, Vanilla, Food Coloring, Vinegar, and Buttermilk: Beat in the egg, vanilla extract, red food coloring, white vinegar, and buttermilk until smooth and combined.
- Add the Dry Ingredients: Gradually add the dry ingredients to the wet ingredients, mixing just until combined. Be careful not to overmix.
- Bake the Cookie Cake: Transfer the dough into the prepared cake pan and press it down into an even layer. Bake for 25-30 minutes, or until a toothpick inserted into the center comes out clean.
- Cool the Cookie Cake: Allow the cookie cake to cool in the pan for about 10 minutes before transferring it to a wire rack to cool completely, about 30 minutes.
Prepare the Cream Cheese Frosting:
- Beat the Cream Cheese and Butter: In a large bowl, beat the softened cream cheese and butter together until smooth and creamy.
- Add the Powdered Sugar and Vanilla: Gradually add the powdered sugar, ½ cup at a time, and beat until smooth and fluffy. Add the vanilla extract and a pinch of salt, and beat until fully combined.
- Frost the Cookie Cake: Once the cookie cake has cooled completely, spread the cream cheese frosting evenly over the top using a spatula.
Serve and Garnish:
- Decorate the Cookie Cake: Optionally, you can decorate the top with sprinkles, mini chocolate chips, or a personalized message using colored frosting.
- Serve: Slice into wedges or squares and enjoy!
Nutrition
- Serving Size: 12-16 servings
- Calories: 350-400
- Fat: 18g
- Carbohydrates: 45g
- Protein: 4g
Conclusion
Red Velvet Cookie Cake is the perfect way to enjoy the classic flavors of red velvet cake in a fun, shareable format. Soft, chewy, and topped with a tangy cream cheese frosting, this dessert is guaranteed to wow your guests and satisfy your sweet tooth. Whether you’re celebrating a special occasion or just indulging in a sweet treat, this cookie cake is sure to be a crowd-pleaser!
With its rich red hue and velvety texture, this cookie cake combines the best of both worlds—the comforting chew of a cookie and the indulgence of a cake. The tangy cream cheese frosting adds the perfect finishing touch, balancing out the sweetness of the cookie.
This recipe is easy to make and perfect for any celebration or casual gathering. It’s fun to decorate, too—whether you’re adding sprinkles, chocolate chips, or a personalized message on top, you can make it uniquely yours.
I’d love to see your Red Velvet Cookie Cake in all its glory! Snap a photo, share it on social media, and don’t forget to tag me—I can’t wait to see your delicious creation. Happy baking!