


Discover the Kitchen Tool Everyone Is Raving About!
- • Precision Engineered: Sharp blade with durable craftsmanship.
- • Comfort First: Ergonomic design for effortless slicing.
- • Stylish & Strong: Elegant wood handle meets stainless steel strength.
- • Risk-Free Pick: Thousands of happy home chefs can’t be wrong.
- • Today’s Deal: Just $29.95 instead of $99.85 — limited-time offer!
This post may include affiliate links — learn more here .
Introduction
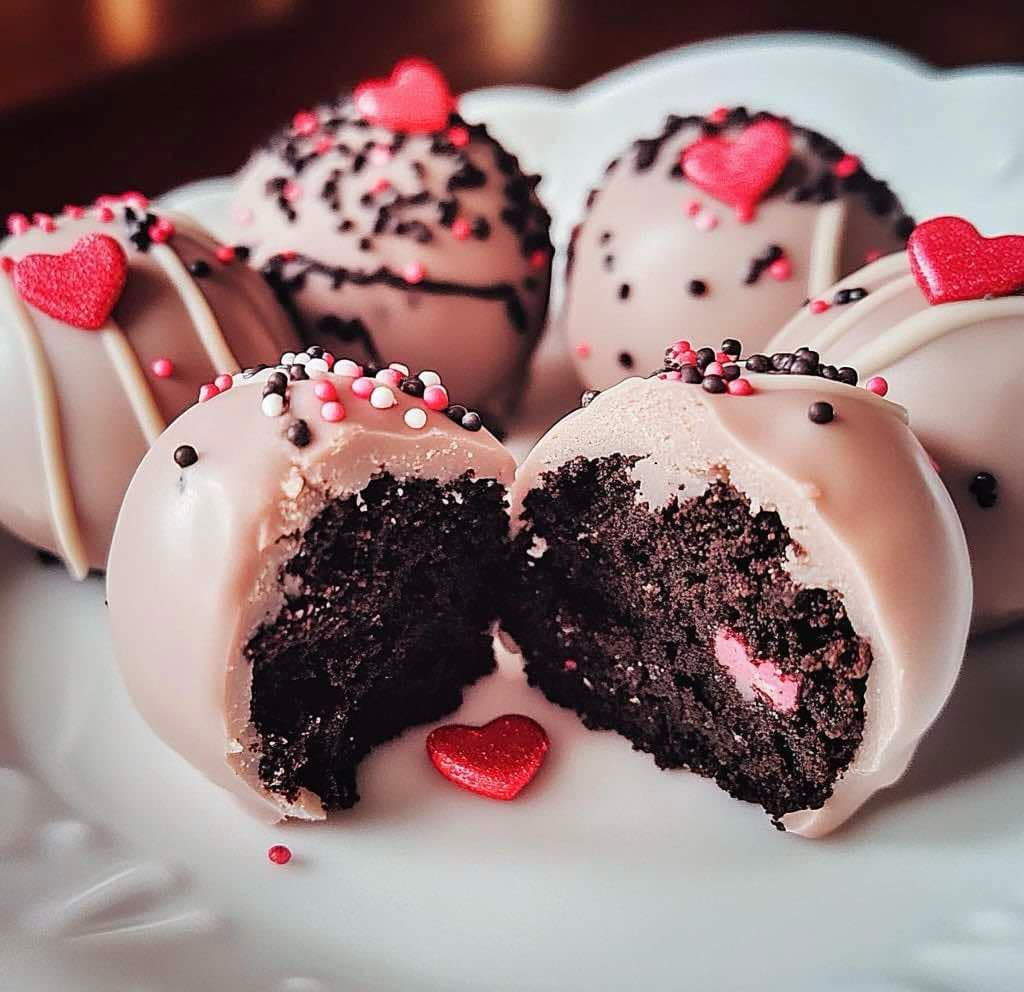
Valentine Oreo Balls are the perfect sweet treat for spreading love on Valentine’s Day or any special occasion. These bite-sized delights feature the perfect blend of crushed Oreo cookies and cream cheese, coated in a smooth layer of chocolate, and finished with a touch of love. With their rich, decadent flavor and festive appearance, these Oreo balls are as much a treat for the eyes as they are for the taste buds. Whether you’re surprising your sweetheart or sharing with friends, Valentine Oreo Balls are sure to bring smiles to everyone!
I remember the first time I made these for a Valentine’s Day get-together. The moment I placed them on the table, everyone’s eyes lit up, and I could feel the love and excitement in the air. The combination of the creamy filling and chocolate coating made them irresistible, and before I knew it, the plate was empty. These Oreo balls are always a hit at any gathering, and they bring a little extra sweetness to any celebration.
Perfect for:
- Valentine’s Day gifts
- Sweet treats for a party or gathering
- A fun, DIY dessert project with kids
- Surprise gifts for loved ones
Why You’ll Love This Recipe
Here’s why Valentine Oreo Balls are a must-try:
- No-Bake Treat: These Oreo balls are super easy to make and don’t require any baking, making them a quick and hassle-free dessert option.
- Perfect for Gift Giving: They make the perfect homemade gift for Valentine’s Day, beautifully decorated and packed for a personal touch.
- Rich and Creamy: The combination of crushed Oreo cookies and cream cheese creates a creamy filling that melts in your mouth.
- Customizable Coating: Dip them in your favorite chocolate and add colorful sprinkles or drizzles for a fun and festive look.
- Kid-Friendly: With minimal ingredients and no complicated steps, this recipe is a fun and easy project to do with children.
Preparation and Cooking Time
- Total Time: 1 hour (includes chilling time)
- Preparation Time: 15 minutes
- Chilling Time: 45 minutes
- Servings: 20-24 balls
- Calories per serving: Approximately 100-120 calories
- Key Nutrients: Protein: 2g, Carbs: 14g, Fat: 6g
Ingredients
Gather these ingredients to make your Valentine Oreo Balls:
For the Oreo Ball Filling:
- 1 package (15.25 oz) Oreo cookies (regular or family-size)
- 8 oz cream cheese, softened
For the Coating:
- 8 oz white chocolate or semi-sweet chocolate chips (or a combination of both)
- ¼ cup red or pink candy melts (optional for decoration)
- Valentine’s Day sprinkles (optional for decoration)
- Heart-shaped sprinkles or edible glitter (optional for a festive touch)
Ingredient Highlights
- Oreo Cookies: The classic chocolate sandwich cookie, crushed to create the base of these creamy, indulgent bites.
- Cream Cheese: Softened cream cheese binds the crushed Oreos, adding a smooth texture and rich flavor to the filling.
- Chocolate: The key to coating these Oreo balls, providing a sweet, smooth finish. You can choose white chocolate, milk chocolate, or semi-sweet, depending on your preference.
- Candy Melts: Add vibrant colors and an extra fun element to your Valentine Oreo Balls. You can use red or pink candy melts to give them a festive look.
Step-by-Step
 Instructions
Here’s how to make Valentine Oreo Balls:
Prepare the Oreo Filling:
- Crush the Oreos: Place the Oreo cookies in a large zip-top bag or food processor. Crush the cookies into fine crumbs, being careful to remove the filling if you prefer. Alternatively, place the cookies in a large bowl and crush them with a rolling pin.
- Mix with Cream Cheese: In a medium mixing bowl, combine the Oreo crumbs with softened cream cheese. Use a spatula or your hands to mix until well combined, creating a dough-like consistency.
Shape the Balls:
- Form the Oreo Balls: Roll the mixture into 1-inch balls, placing them on a baking sheet lined with parchment paper or a silicone baking mat. Try to make the balls as uniform in size as possible for even coating.
- Chill the Balls: Place the baking sheet with the Oreo balls in the refrigerator for at least 30 minutes to allow them to firm up.
Coat the Oreo Balls:
- Melt the Chocolate: While the Oreo balls chill, melt your chocolate in a heatproof bowl over a double boiler or in the microwave in 30-second intervals, stirring between each interval, until smooth and melted.
- Dip the Oreo Balls: Once the balls have firmed up, dip each one into the melted chocolate using a fork or a skewer. Gently tap the fork against the edge of the bowl to remove any excess chocolate.
- Decorate: If desired, melt red or pink candy melts and drizzle over the Oreo balls for a fun Valentine’s Day look. You can also sprinkle Valentine’s Day sprinkles or edible glitter on top for extra flair.
Let the Coating Set:
- Chill Again: Place the coated Oreo balls back in the refrigerator for at least 15 minutes to set the chocolate. Once set, they are ready to serve or package up as gifts.
How to Serve
- Gift Giving: Package the Oreo balls in a cute tin, box, or bag for a thoughtful homemade Valentine’s Day gift.
- For a Party: Serve these delicious Oreo balls on a dessert platter at a Valentine’s Day party or gathering.
- With a Hot Drink: Pair them with a cup of hot cocoa or a creamy latte for a cozy treat.
- For a Sweet Snack: Enjoy these Oreo balls as an easy grab-and-go dessert when you need a sweet pick-me-up.
Additional Tips
- Use Room Temperature Cream Cheese: For a smoother filling, make sure the cream cheese is softened at room temperature.
- Chill Well: Chilling the Oreo balls before coating helps them hold their shape and makes the coating process easier.
- Use a Toothpick: To dip the Oreo balls in chocolate, you can use a toothpick to help coat them without making a mess.
- Make Ahead: These Oreo balls can be made in advance and stored in the fridge for up to a week or frozen for up to 2 months.
Recipe Variations
- Peanut Butter Oreo Balls – Add ½ cup of peanut butter to the Oreo mixture.
- Mint Oreo Balls – Use mint-flavored Oreos for a refreshing twist.
- Strawberry Oreo Balls – Use strawberry-flavored Oreos for a fruity variation.
- Coconut Oreo Balls – Mix shredded coconut into the filling for a tropical flavor.
- Dark Chocolate Oreo Balls – Coat with dark chocolate instead of white chocolate for a rich flavor.
- Caramel Oreo Balls – Drizzle with caramel sauce or add caramel-flavored chocolate for an extra indulgence.
- White Chocolate Raspberry Oreo Balls – Add a spoonful of raspberry jam or puree to the Oreo filling.
- Rainbow Oreo Balls – Coat with colorful candy melts for a fun and festive look.
- Cinnamon Oreo Balls – Add a pinch of cinnamon to the filling for a spiced-up treat.
- Vegan Oreo Balls – Use non-dairy cream cheese and vegan chocolate for a dairy-free version.
Freezing and Storage
- Freezing: To freeze, place the Oreo balls on a baking sheet and freeze them for about 1 hour. Afterward, transfer them to an airtight container and freeze for up to 2 months.
- Storage: Store in an airtight container in the refrigerator for up to 1 week.
Special Equipment
- Food processor or rolling pin (for crushing Oreos)
- Double boiler or microwave-safe bowl (for melting chocolate)
- Parchment paper or silicone mat (for lining the baking sheet)
FAQ Section
- Can I use regular or gluten-free Oreos? Yes, both work well in this recipe.
- Can I make these without cream cheese? You can substitute with a dairy-free cream cheese or other alternatives, but the texture may vary.
- Can I add other fillings? Feel free to add chopped nuts, candies, or dried fruit to the filling.
- How long will these last? They can be stored in the fridge for up to a week.
- Can I freeze these? Yes! Freeze them for up to 2 months.
Valentine Oreo Balls

- Prep Time: 15 minutes
- Total Time: 1 hour (includes chilling time)
Ingredients
For the Oreo Ball Filling:
- 1 package (15.25 oz) Oreo cookies (regular or family-size)
- 8 oz cream cheese, softened
For the Coating:
- 8 oz white chocolate or semi-sweet chocolate chips (or a combination of both)
- ¼ cup red or pink candy melts (optional for decoration)
- Valentine’s Day sprinkles (optional for decoration)
- Heart-shaped sprinkles or edible glitter (optional for a festive touch)
Instructions
Prepare the Oreo Filling:
- Crush the Oreos: Place the Oreo cookies in a large zip-top bag or food processor. Crush the cookies into fine crumbs, being careful to remove the filling if you prefer. Alternatively, place the cookies in a large bowl and crush them with a rolling pin.
- Mix with Cream Cheese: In a medium mixing bowl, combine the Oreo crumbs with softened cream cheese. Use a spatula or your hands to mix until well combined, creating a dough-like consistency.
Shape the Balls:
- Form the Oreo Balls: Roll the mixture into 1-inch balls, placing them on a baking sheet lined with parchment paper or a silicone baking mat. Try to make the balls as uniform in size as possible for even coating.
- Chill the Balls: Place the baking sheet with the Oreo balls in the refrigerator for at least 30 minutes to allow them to firm up.
Coat the Oreo Balls:
- Melt the Chocolate: While the Oreo balls chill, melt your chocolate in a heatproof bowl over a double boiler or in the microwave in 30-second intervals, stirring between each interval, until smooth and melted.
- Dip the Oreo Balls: Once the balls have firmed up, dip each one into the melted chocolate using a fork or a skewer. Gently tap the fork against the edge of the bowl to remove any excess chocolate.
- Decorate: If desired, melt red or pink candy melts and drizzle over the Oreo balls for a fun Valentine’s Day look. You can also sprinkle Valentine’s Day sprinkles or edible glitter on top for extra flair.
Let the Coating Set:
- Chill Again: Place the coated Oreo balls back in the refrigerator for at least 15 minutes to set the chocolate. Once set, they are ready to serve or package up as gifts.
Nutrition
- Serving Size: 20-24 balls
- Calories: 100-120
- Fat: 6g
- Carbohydrates: 14g
- Protein: 2g
Conclusion
Valentine Oreo Balls are a fun, festive, and delicious treat for celebrating love! With their rich, chocolatey coating and creamy Oreo filling, these bite-sized delights are the perfect way to spread joy. Whether you’re gifting them or sharing them with friends and family, these little chocolate-dipped bites will leave everyone smiling.
Simple to make and oh-so-sweet, these Oreo balls are sure to be a hit on any occasion. Customize them with a sprinkle of festive decorations or colorful sprinkles to add an extra touch of love. They’re the ideal treat for Valentine’s Day, parties, or just a sweet moment to share with loved ones.
I’d love to see how your Valentine Oreo Balls turn out! Snap a photo, share it on social media, and don’t forget to tag me—I can’t wait to see your delicious creations. Happy baking!